The Blacksmithing Classroom
BLACK
LIVES
MATTER
will all lives matter
|
|
PROSPECT HILL FORGE The Blacksmithing Classroom |
BLACK LIVES MATTER will all lives matter |
|
Many of the features of this website use JavaScript. Your browser either doesn't support Javascript, or you have it disabled. You will need Javascript enabled to view our complete class descriptions or use our otherwise convenient registration and email links. If you'd rather, you can reach us directly by phone:
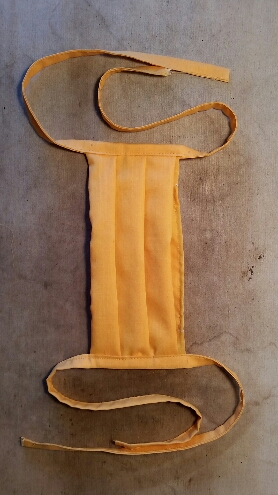
A Triple-Pleater to speed by-hand production of facemasks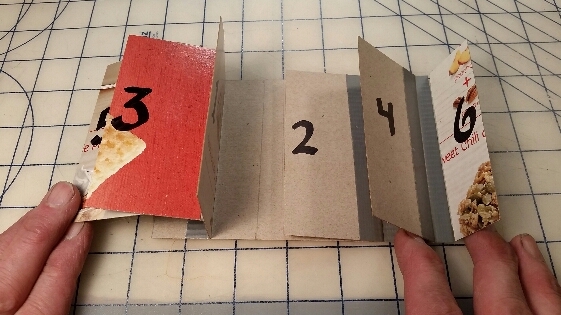
To use the pleater you'll need a spring-action clothespin or some similar clip-like device. A large paperclip might suffice.
You'll be making your pleater about an inch narrower than the fabric you'll be using for the masks.
If for example you are making 7" wide masks, you'll make the pleater 6" wide. [Through this tutorial I'll be using 'long' to mean in the long direction of the pleater and 'wide' to mean in the direction of the width of the pleater. The 'sides' are the long edges of the pleater. So, while describing a piece of cardboard as 2" long and 6" wide seems odd, it should help make the intended orientation and placement of the parts a bit clearer.]
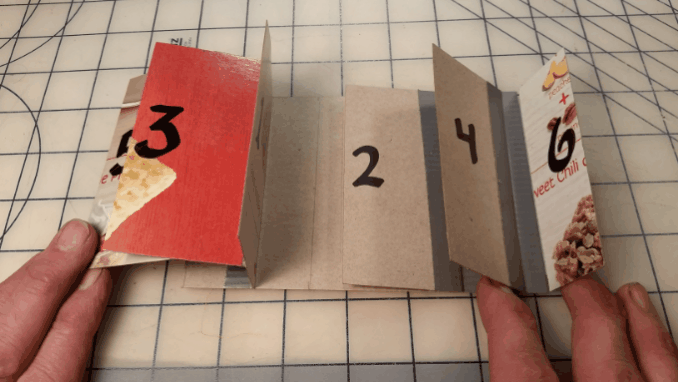
A) Cut the CardboardUse the pen and ruler to lay out then cut a 6" wide by 8" or so long piece from your cardboard. This will be the 'base'.Also lay out and cut five(5) 2" long by 6" wide strips, and one 1-1/4" long by 6" wide. These will be the flaps. At least one 6" edge of each flap should be really straight, this will be the 'good' edge. Getting the edges parallel and the ends square is nice, and is helpful, but not absolutely utterly vital. When laying out the flaps avoid existing folds and creases in the cardboard, these pieces need to be stiff.
B) Lay out and tape down the first right-side flapPrepare at least one piece of tape 6" long (as many as six if you have places to put them conveniently and safely)With the base in front of you, its long direction going left-to-right (landscape format), place a flap with its good edge to the left about 3" from the left end of the base. Line it up with the edges of the base and make it as square and straight across as you can. Tape down the flap's right edge. Well and firmly. Construction has begun! Label this flap #2.
C) Then the second right-side flapOn the first flap as it lies there, taped down, on each side make a mark 1/2" from its left edge and another 1" from the left edge.With your next flap's good edge on the left, align that edge to those 1" marks and tape its right edge down to the base. Well and firmly. (the 1/2" marks are for later) Label this flap #4.
D) And the third right-side flapMark flap #4 like you marked flap #2, and align the 1-1/4" flap's left edge to the 1" marks on #4. Don't tape it down yet.Mark on the base where the right edge of this flap is and cut the base at that line. Then tape the flap to the base, wrapping the tape around the edge to the underside of the base Well and firmly. And label it #6. Then make 1/2" marks on this flap, you don't need the 1" marks. (hmmm... with care, y'could just pre-mark all the flaps all at once...)
E) Align and tape down the first left-side flapHolding a flap with it's good edge to the right, align that edge to the 1/2" marks on flap #2 and tape its left edge down to the base. Well and firmly. Label this flap #1.
F) Then the second left-side flapAlign a flap's good right edge to the 1/2" marks on flap #4 and tape its left edge down to flap #1. Well and firmly. Label this one #3.
G) And the third left-side flapAlign the last flap's good right edge to the 1/2" marks on flap #6 and tape its left edge down to flap #3. Well and firmly. Label this flap #5.
H) Strengthen the jointsMake 6 more strips of tape. Lay each hinge out flat the other way and tape the inside of each joint. Well and firmly. And the joints should hold for quite some while. Construction is now finished!
Tuning-up the PleaterStart by folding flap #2 in, to the left, and marking on the base where it comes to. Use this as a starting point.Fold flap #2 out of the way.
People seem to like having the pleats point downward, so...
Using the PleaterWhen you have the start line settled, put your mask material in sticking out 1/2" on each side, do the folds, clip flap #6 with the clothespin or paper clip and you now have the material captive in a way that will let you stitch or serge the edges to make a component or even go straight into a binding to make a finished mask.That part is up to you and whatever design you are making.
Note that there is no pressing necessary to make this pleating happen.
That's what I've got as of April 14 2020 4:28am,
|